So you just bought your first embroidery machine. Or maybe you have had one for a while, but every time you try to stitch a custom logo, the results look nothing like the picture on your screen. You are not alone. Most beginners hit this wall quickly. You have the machine, the thread, and the blank garments. But without a file that tells your machine where to put each stitch, you have nothing. That is where professional help steps in. Let us break down everything you need to know about digitizing services for embroidery.
What Exactly Are Digitizing Services for Embroidery?
Think of digitizing as translating a language. Your artwork speaks in pixels and colors. Your embroidery machine speaks in stitches, angles, and densities. A digitizing service takes your logo, text, or design and converts it into a file your machine understands. That file contains thousands of individual stitch commands. It tells the machine exactly where to start, which direction to sew, when to change thread colors, and when to trim.
For beginners, this process sounds simple. You upload a JPEG, pay a few dollars, and download a file. But real digitizing involves much more. A professional digitizer studies your artwork, identifies tricky areas like small text or sharp corners, and adjusts stitch settings to match your fabric type. They add underlay stitches that stabilize the material. They compensate for thread pull so your circles stay round. They do all of this so you can focus on running your machine instead of fighting it.
Why Beginners Struggle Without Professional Help
You might feel tempted to buy digitizing software and learn the skill yourself. Many beginners try this route. They watch YouTube tutorials, practice for weeks, and eventually produce something that sews. But the learning curve is steep. Professional digitizing software costs hundreds or thousands of dollars. Even after you buy it, you need dozens of hours to understand pull compensation, stitch density, underlay patterns, and fabric behavior.
Meanwhile, your business needs to produce actual products. Every hour you spend learning digitizing is an hour you are not stitching orders. Outsourcing to a professional service lets you skip the painful learning phase. You pay a small fee per design and receive a ready-to-sew file. No frustration. No wasted materials. No broken needles because your density was too high.
What to Expect When You Hire a Digitizing Service
The process usually follows a simple pattern. You send your artwork, usually in JPG, PNG, AI, or EPS format. The service asks about your intended use. What fabric will you sew on? What size should the final design be? How many colors does your machine handle? A good service asks these questions because the answers change how they digitize.
After you provide the details, a professional digitizer works on your file. They open your artwork in specialized software and manually plot each stitch path. They decide where to use satin stitches for borders and tatami fills for large areas. They add underlay and adjust pull compensation. They sequence the colors logically. The entire process takes anywhere from one hour for a simple logo to half a day for a complex design.
Once finished, they send you a digital preview. Some services also mail a physical sew-out sample. You review the file, approve it, or request changes. Most quality services include at least one free revision. After you say yes, they deliver the final file in your preferred format, such as DST, PES, or EXP.
How to Prepare Your Artwork for Digitizing
You do not need to be a graphic designer, but a little preparation goes a long way. Start with the cleanest version of your logo. Avoid images pulled from a website or a screenshot. Those files are usually small and compressed. Aim for at least 300 DPI and a size close to what you want embroidered.
Remove gradients, drop shadows, and glows. Embroidery works with solid colors only. A professional digitizer can simulate gradients using different stitch densities, but the process costs more. For your first few projects, stick to flat, solid-color designs. Also convert all text to outlines if possible. That way, the digitizer sees the exact shape of each letter without relying on a specific font installed on their computer.
If your artwork looks blurry or jagged, consider getting it vector traced first. Vector files use mathematical lines instead of pixels. They scale perfectly and give digitizers clean paths to follow. Many digitizing services offer vector tracing as an add-on.
Common Mistakes Beginners Make and How to Avoid Them
The biggest mistake involves sending tiny images. A logo that looks fine on a business card might be only 300 pixels wide. When the digitizer zooms in, they see blurry edges and have to guess the true shape. Always send the largest, highest resolution version you have.
Another common error is forgetting to specify the final stitch size. A design digitized for four inches will stitch poorly at two inches. Letters become too dense and fill in. Details disappear. Always tell the service exactly how wide or tall you want the final embroidery.
Beginners also overlook fabric differences. A file that stitches beautifully on a cotton twill cap will pucker badly on a nylon jacket. The digitizer needs to know whether you plan to sew on denim, pique knit, fleece, leather, or performance mesh. Each fabric requires different underlay and pull compensation settings.
Finally, many beginners expect instant turnaround. Quality digitizing takes time. A service that promises every logo in two hours likely uses automated software. That software misses the nuances a human digitizer catches. Plan for at least 24 hours for a standard logo.
How Much Do Digitizing Services Cost in 2026?
Pricing varies, but you can expect to pay between ten and thirty dollars for a typical logo up to four inches. Simple text-only designs might cost eight dollars. Complex designs with tiny details, multiple colors, or intricate curves can run forty dollars or more. Rush fees add twenty to fifty percent.
Some services charge by stitch count. A design with ten thousand stitches costs less than one with thirty thousand stitches. Others charge a flat rate per design regardless of complexity. Flat rates work well for simple logos but may cost more for detailed work. Ask for a quote before you commit.
Many beginners worry about the cost of digitizing multiple designs. Consider this: a fifteen-dollar digitized file that sews perfectly on the first try saves you more money than a ten-dollar file that requires three test runs, wasted fabric, and operator frustration. Pay for quality. The cheap options almost always end up costing more in the long run.
How to Choose the Right Provider for Your First Order
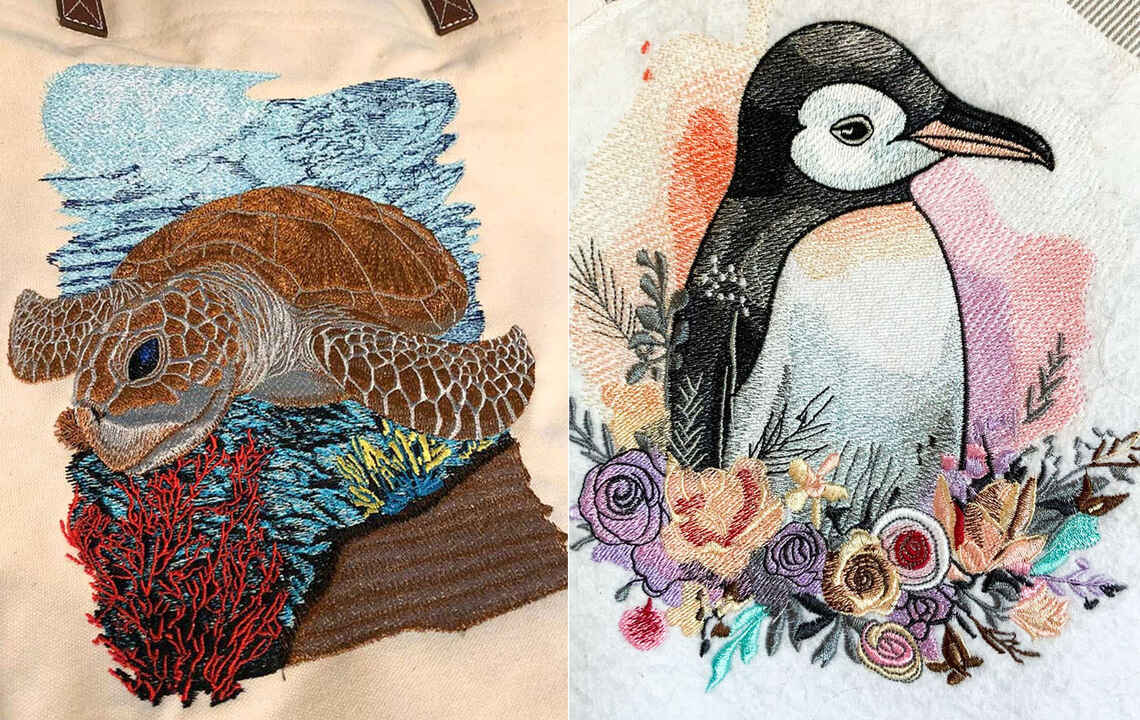
Start by looking for a service that specializes in embroidery, not general graphic design. Check their website for sample work. Do they show real stitch-outs or only digital mockups? Real stitch-outs reveal their actual quality. Mockups hide flaws.
Read reviews from other beginners. Pay attention to comments about turnaround time, communication, and revision policies. A service that ignores emails or fights every revision request will drive you crazy.
Before you place a bulk order, test one or two small logos. Ask for a physical sew-out on a sample fabric if possible. Run the file on your machine and examine the results. Look for gaps, puckering, or thread breaks. A good service welcomes this testing phase.
Make sure they support your machine’s file format. Most services offer DST, which works on nearly all commercial machines. But if you use a home embroidery machine from Brother or Janome, you need PES or JEF format. Confirm before you pay.
Why Needle Digitizing Makes Sense for Beginners
If you want a digitizing partner that treats beginners with patience and clarity, Needle Digitizing fits the bill. They explain the process in plain English, not technical jargon. They ask the right questions about your fabric and machine so you do not have to guess. They provide digital previews and offer revisions until you feel confident. And they deliver files in any format you need. For someone just starting their embroidery journey, having that level of support makes all the difference between loving your machine and wanting to throw it out a window.
Conclusion
Stepping into the world of embroidery feels exciting and overwhelming at the same time. Your machine can create amazing things, but only if you feed it the right files. Professional digitizing services for embroidery remove the guesswork. They turn your artwork into clean, reliable stitch files that run smoothly on your first try. No more wasted thread, ruined garments, or frustrating test sews. Find a service that communicates clearly, delivers quality samples, and stands behind their work. Start with a small test order. Build a relationship with a digitizer who treats your brand as carefully as you do. Your embroidery business will thank you.